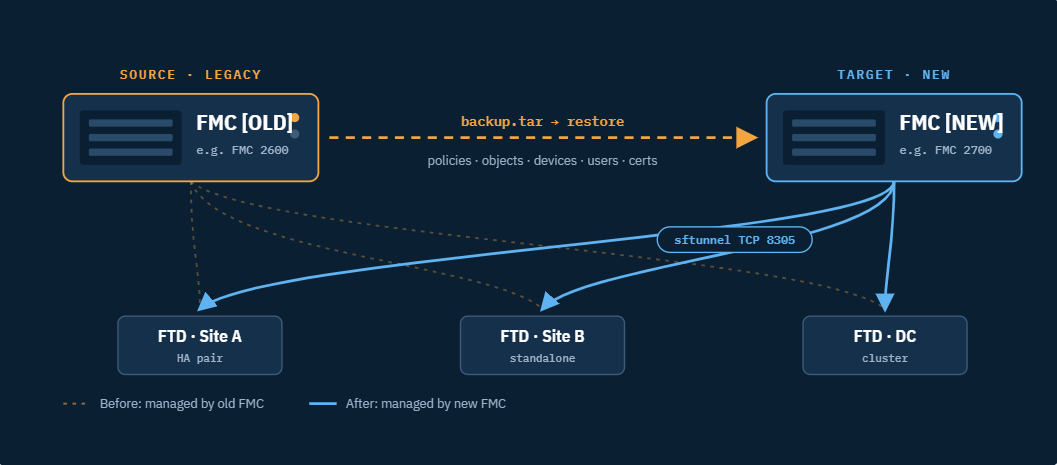
Recently I completed a Cisco Firewall Management Center migration. For those who don’t know, for the on-premise virtual FMC, Cisco sells a 25 firewall license and a 300 firewall license. This customer of mine is planning to install firewalls at each of their branch locations and will exceed their existing FMCv25 license. So to prepare for this firewall installation project, the customer asked me to first upgrade their FMC from the 25 license to the 300 license Firewall Management Center.
This process entails spinning up a new vFMC image designed for the FMCv300, in this case in VMware, and migrating the existing configuration over from the old FMC to the new. Additionally, the customer was taking advantage of this opportunity to move the FMC to a new datacenter, so the IPs of the new FMC would no longer be the same as the old FMC, so that adds to the complexity of the deployment.
Luckily for us Cisco has a migration script imbedded in to all virtual FMC images. This script takes the backup of the old FMC and restores it on the new FMC to be an identical twin of the old, IPs, hostnames, identity certificates, the whole shebang. So lets go though the process, and I will also add what I added to change the IP of the new FMC, for reference here is the link to the Cisco guide I followed:
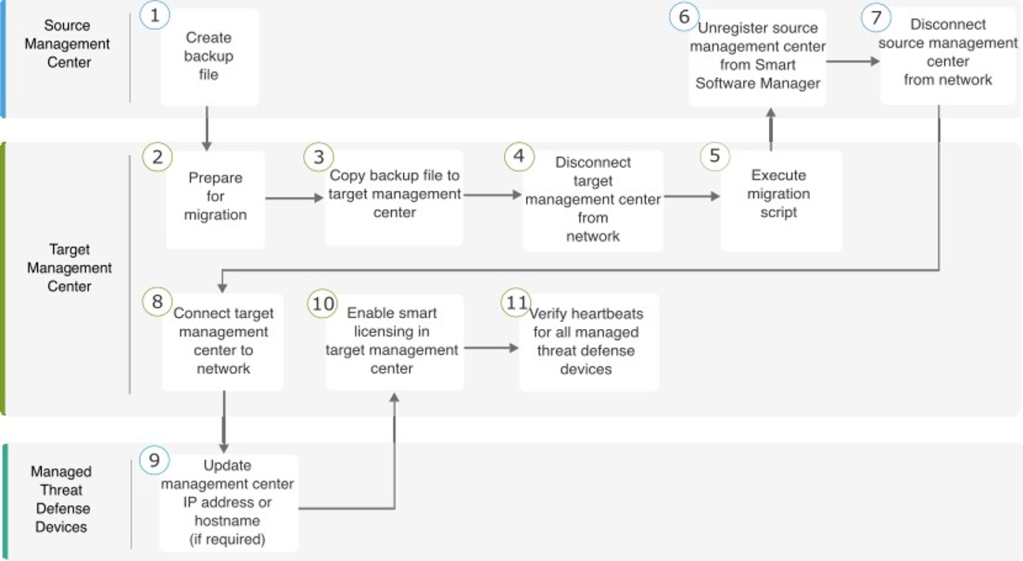
Note in the flow chart above the old FMC is called Source Management Center, and the new FMC is called Target Management Center.
The Prep
Before the cutover to the new FMC there is some prep work that needs to be done. Here is my list of items that I prepared before the cutover:
- Deploy the new FMCv300 using a temporary IP.
- Create a backup file in the source management center.
- Copy the generated backup file to the target management center.
- Disconnect the target management center from the network.
- Validate SSH access to each of the firewalls
The very first thing to do to prep the migration is to deploy the new VM using the FMCv300 image. To make prepping the new FMC easier, I suggest using a temporary IP on the network so that you can access the GUI. This IP will be overwritten when the migration script is ran, so it is truly temporary.
The next thing to prep is to create the backup file on the old FMC. During this process, if the old FMC is configured to send the backup to an external server you may want to change this to be local backup. For me this was the case because I did not have access to the file server that the FMC was backing up to. The simplest way to stop the backup from being sent to remote storage is to uncheck the “Use for Backups” checkbox under the Remote Storage settings.
The backup requires at least the “Back Up Configuration” check box to be checked, however if you want to migrate your logs and Threat signatures, check the “Backup Events” and “Backup Threat Intelligence Director” checkboxes when creating the backup. Note that doing so will balloon the backup to a very large size. I chose this option and my backup ended up being 10 GB in size. So prepare for the backup to take a few hours, and to have a way to download a large file, download over VPN isn’t gonna cut it, a local machine is needed to avoid timeouts with the web browser.
Next download the backup from the old FMC and upload it to the new FMC using the temporary GUI IP. This process is as simple as navigating to Backup/Restore and clicking Upload Backup. Then choosing the backup file you downloaded from the old FMC.
After the backup has been uploaded to the new FMC, we no longer need the temporary IP, and we don’t want the VM to be on the network. Because the migration script will re-IP the new FMC with the same IP as the old, we don’t want to cause a duplicate IP situation on the network. For this I was able to go into vCenter and just disable the NIC on the new FMC VM. Depending on your hypervisor, this step will look different, but the end goal is to remove the new VM from the network, while at the same time keeping console access to the VM. For me, I used vCenter Console to get access to the new FMC.
The last piece to prep is just to validate that you have the local credentials for the FTD firewalls that FMC manages. There will be a point where we disconnect the old FMC and bring up the new FMC, and the sftunnels will need to reestablish. If a tunnel does come back up, its good to validate that you have local access to the firewall to begin troubleshooting.
The Migration
You did all the prep work, and the day has finally come! ITS TIME TO MIGRATE! Here are the tasks needed to complete the migration and to change the IP of the FMC, if you plan on changing the IP:
- Execute the migration script in the target management center.
- Unregister your source management center from Cisco Smart Software Manager (CSSM).
- Disconnect the source management center from the network.
- Change the IP of the Target FMC back to the orginal IP address and hostname.
- Connect the target management center to your network.
- Update the manager details on all the managed threat defense devices.
- Enable smart licensing in the target management center.
The first thing that needs to be done is to kick off the migration script. This script, which is already built into the FMC image, will clone the new FMC based on the backup file its given. This process takes some time depending on the size of the backup file. When I asked Google AI how long it should take it claimed to take an hour, but for our 10 GB backup file it took 20 minutes. Its a great time to go grab some coffee or take a bio break.
Log into the Console of the new FMC, and run the command “expert”. This will drop you into the root shell of the machine. Then run the following:
/var/sf/bin/sf-migration.pl {backup_file_path}example:root@firepower:# /var/sf/bin/sf-migration.pl /var/sf/backup/100localbackup-2023-05-20examp.tar
Note that if you upload the backup using the GUI to the local repository then the backup file will be in the /var/sf/backup directory.
While the migration script is running, this is actually a great time to get started on the next two steps. The next step is to go into the old FMC, navigate to the smart license section of the FMC and click “Deregister”. We want to remove the registration from the smart licensing portal otherwise you will get license overages because two FMCs are claiming the same licenses. By deregistering from the old, we free up the licenses to be consumed later by the new FMC. Note you will need to have purchased a new FMCv300 license, the old FMCv25 license won’t work on the new FMC.
The second step we can work on while the migration script is running is to disconnect the old FMC from the network. The same technique used to disconnect the new FMC should work for the old FMC. Note that the firewalls will loose their sftunnels at this point, but they will still pass traffic. The only things that will be down is management traffic, and any items that rely on the FMC, such as Event log collection. Ideally this work should be done during a maintenance window to minimize the traffic on the network.
Once the migration script has completed on the new FMC, the VM will reboot and come back with the persona of the old FMC. At this point if you are not going to re-IP the new FMC then you are ready for it to be brought back online. If, like me, you need to re-IP it to a new IP then you will need to do the following step. Log in to the FMC via Console. Note that this FMC is now the persona of the old FMC, so you will need the admin password set on the old FMC, not the new one you created when deploying the new FMCv300 image. If you forgot the password, check out this blog that goes into how to reset the admin password for FMC.
https://antonioyan.wordpress.com/2023/10/16/fmc-admin-password-reset/
Once in to the console, run the command “expert”. Then execute the network configuration script. This script is the same script that is run when you first booted a fresh image of FMC. Follow the prompts to re-IP the machine.
sudo /usr/local/sf/bin/configure-network
Now you can bring the new FMC back on the network. Do so in the same way you took it off the network. For me, we reenabled the NIC of the VM in vCenter. At this point you should start to see sftunnels reestablish with this FMC. If you changed the IP address of the new FMC and the firewalls are not behind a NAT device, meaning you have a separate WAN that allows the FMC to talk to the management port of the FTDs, then you should still see the tunnels come back up. The reason for this is that when you add an FTD to a manager, a UUID is created and used to validate the sftunnel. When you use the migration script you maintain those UUIDs, so as long as the FMC can initiate the tunnel, there will be a valid authentication with the FTD and the tunnels will reestablish.
If the FMC is behind a NAT device, ie you use the outside interface as the management interface to talk to FMC via the internet, then you will need to manually log into each firewall and update the manager IP. You do this in a three part step. First ssh into the firewall and run the command “show managers” to find the UUID of the sftunnel. Then with the UUID, run these two commands:
configure manager edit {fmc_uuid} hostname {fmc_ipaddress}configure manager edit {fmc_uuid} displayname {fmc_ipaddress}Example:> show managersType : ManagerHost : 192.168.1.10Display name : 192.168.1.10Identifier : f7ffad78-bf16-11ec-a737-baa2f76ef602Registration : CompletedManagement type : Configuration and analytics> configure manager edit f7ffad78-bf16-11ec-a737-baa2f76ef602 hostname 192.168.1.10> configure manager edit f7ffad78-bf16-11ec-a737-baa2f76ef602 displayname 192.168.1.10
Note that if you have FMC registered in DNS, you can use an FQDN rather than an IP for the host and display names.
Finally, once all of the FTD firewalls are once more talking to the new FMC you will need to enable smart licensing. Go to the Smart license portal, select the virtual account that the licenses are in and create a new token. Copy that token and on the new FMC navigate to the smart license page and click “Register”. Paste the token in the Product Instance Registration Token field and click ok. The FMC will then register with the smart license server and pull in all your licenses. Note that before you do this you might notice a ton of errors on the FMC. Just ignore them for now and complete the license registration. I had a ton of errors when I completed this task and they all went away once the firewalls were licensed again.
Alright, you did it! You completed the migration and its time to pat yourself on the back and crack open a beer. You will want to make sure at some point the old FMC is shutdown and deleted, but that sounds like a Monday task. I do suggest to hold off on deleting the old FMC for a short period of time to make sure there isn’t any reason to rollback. Speaking of rollback, disabling and reenabling the NICs of the two VMs is basically how you can toggle between which FMC the firewalls will talk to; assuming your FTDs aren’t behind a NAT device. You should also deregister and reregister the FMCs with Smart Licensing if for some reason you need to rollback.

