For the last few years we have been able to manage the Catalyst 9300 switches in the Meraki portal. Cisco figured out if they create a special version of IOS-XE with a container used for connecting to the Meraki cloud, then you can manage the switch the same way we manage traditional Meraki MS switches. The 9300 was the perfect platform because it has the same form factor as the existing MS switches, and importantly, it has dedicated stacking ports / cables. The same technology used to stack MS switches can be used to stack the 9300 switch with the Meraki portal.
This was great for the 9300s and Cisco sense the 9300 platform is perfect as access switches, and Cisco has sold a metric ton of 9300 as access switches. But there was still one glaring issue; while you could manage all your access switches via Meraki, you would still need to manage your core/distribution switches via traditional CLI, or opt out of the Catalyst line and choose the MS distribution switch. See the Catalyst 9500 series of switches are the most popular choice in Cisco’s line up to be used as a distribution / collapsed core switch. But adding the 9500 to Meraki was impossible because the 9500s don’t use dedicated stacking ports and cables. Instead they use data ports on the front of the switch configured with StackWise Virtual (SVL).
That was then, and this is now. Today Meraki now supports StackWise Virtual, meaning the 9500 series switches can now be managed via Meraki! As of writing this blog, only the High Performance 9500 switches are supported (9500H). Check this documentation to verify the exact switch models:
Convert to Meraki Managed
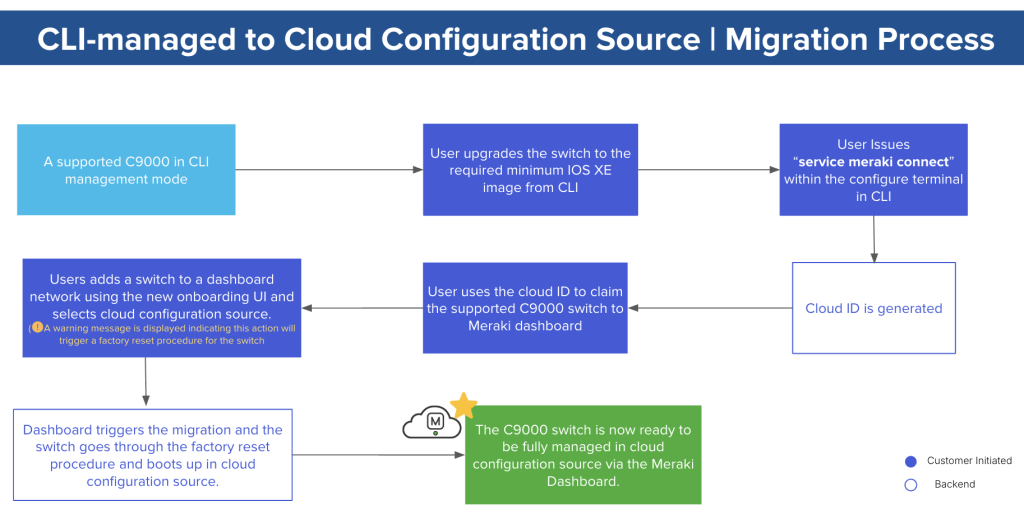
There are two ways to order Catalyst switches from Cisco; CLI-managed and Cloud-managed. As the names suggest CLI managed is the classic IOS-XE image where you manage the switches via SSH. Cloud-managed is management via the Meraki portal. If you order switches and the model number ends with a -M then you know the switch will come from the factory preconfigured to join the Meraki cloud controllers.
If your switch is CLI managed use the Meraki guide above to convert it to Meraki Managed. Doing so will generate a Cloud-ID used to claim the switch in the Meraki Portal, and do note that it will completely factory reset the switch so any configuration will be lost.
When converting your switches treat each individual switch the same way you would any Meraki MS switch. You will need a simple uplink to a network device that provide DHCP and access to the internet, this more often than not is a firewall that is onsite. Keep the configuration simple, either an access port, or a trunk with the native vlan set to the vlan with the DHCP scope in question. Avoid configuration that requires protocol negotiation such as LACP. These switches won’t have any configuration so LACP will fail and the link will never establish.
It is important that both 9500 switches have fully joined the Meraki portal before trying to create the SVL.
Creating the SVL
Just like in CLI-managed mode, an SVL will need at least two links of like speed (the maximum number of links is 8). Additionally another link of any speed, usually a lower bandwidth link, for the Dual Active Detection link or DAD link.
Something else you need to be aware of that actually tripped me up the first time I performed this configuration is that none of these links should be used as uplinks for any of the switches. The SVL configuration will fail if you tried to configure the SVL in the Meraki portal and any of the SVL or DAD links are currently being used as uplink.
The best way to combat this issue (especially if you only have a single uplink to your DHCP device) is to use some other switch that can duel home the uplink connection for each of the 9500s. Then make sure that extra switch is temporarily the spanning-tree root. This will insure that the links used for the SVL and DAD won’t be used as the uplink and the SVL link can succeed. Once configured you can then return any connections to reflect the actual design you intend.
For a full guide on create the SVL and DAD links check out the Meraki Document here:
With the addition of StackWise Virtual link configuration in the Meraki Portal, Cisco has finally brought a full stack solution for the Meraki/Catalyst line. Allowing administrators to monitor and manage Catalyst hardware from the access points to the access switching now to the distribution and core switching. This is just one of a bunch of improvements Cisco/Meraki have made to make the Catalyst line of switches/APs extremely versatile.
