
Last year my company bought Cisco Secure Access and at the same time one of my customers also bought Cisco Secure Access after having some issues with their current setup with Z-scaler. In that time I was exposed pretty intimately with the product and the different components that make up the Secure Access portfolio.
Cisco Secure Access is a converged, cloud-delivered Security Service Edge (SSE) platform that provides secure, unified access to the internet, cloud apps, and private resources for hybrid workforces. It combines the DNS security of Cisco Umbrella with a cloud firewall and a private resource proxy to allow hybrid workers access to on-premise services without having to give them full VPN access.
Being a Cisco product, licensing is always a big question. For SSE each of the three major components maps nicely to the different licensing packages, DNS Defense for DNS-layer security, Secure Internet Access (SIA) to protect access to the internet and SaaS applications (includes DNS Defense capabilities), and Secure Private Access (SPA) to secure access to private applications. Each package comes in “Essentials” or “Advantage” configurations. Cisco published a comparison guide that provides a great visual for each package and what you get: package comparison guide.
In this post lets go through each of the components, explain what they do, and how users interact with them. This post isn’t intended to be a full how-to, but a guide to better understand the product. For a complete guide, check out Cisco’s documentation for the product: https://securitydocs.cisco.com/docs/csa/olh/119038.dita
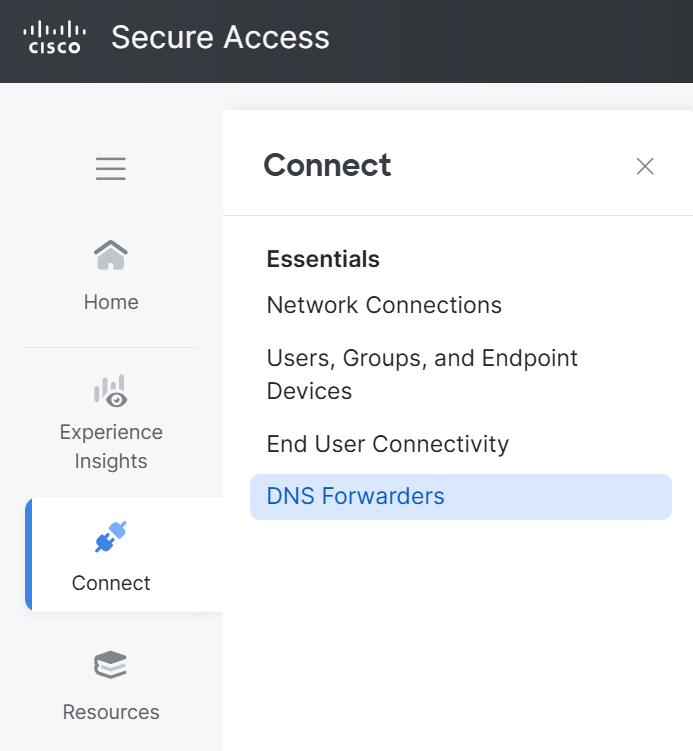
DNS Defense
The usual first place companies who use Cisco Umbrella DNS see of Secure Access is the DNS security. Cisco is “encouraging” existing Umbrella DNS customers to migrate from Umbrella to the equivalent in Secure Access. The good news, the process of deploying VAs and managing policy for Umbrella is identical for Secure Access, and Cisco has built a migration tool to help existing customers, you can find the migration process here: https://www.cisco.com/c/en/us/support/docs/cx/cx-cloud/cx225108-configure-umbrella-for-migration-to.html
Virtual appliances
For those who aren’t familiar to Umbrella, Cisco uses Virtual Appliances (VAs) that stand between the user and the existing internal DNS servers. You tell the VAs which domains to forward to the internal DNS servers, and all other traffic is forwarded to Cisco Public Umbrella DNS servers. The VAs can then enforce policy by blocking the DNS requests. Additionally, AD connectors can pull in user identity to be used by Secure Access in the activity logs. This helps to determine which users the traffic is originating from.
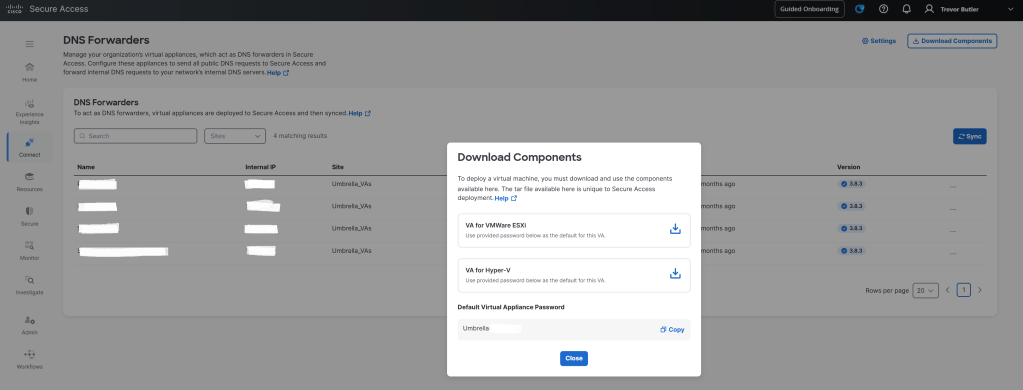
To deploy these VAs navigate to Connect > DNS Forwarders. Here you will see the list of VAs that have been deployed. Note that there isn’t much you can do to existing VAs here. Any network reIPing or changes to domains require SSHing into the VAs themselves and making the changes via the CLI.
To add a new VA you will need to download the VA from your portal. In the upper right corner you will see a button that says Download Components. Clicking this will provide you a popup to download either a VMWare and Hyper-V image of the VA, as well as the default password for the VAs. The Default password is always Umbrella{Secure Access Org ID}.
AD connector
An optional step is to add an AD connector to the VAs to provide identity information to the DNS traffic. (again configured via CLI on the VA itself. These images are identical to the Umbrella VAs so if you are familiar with the Umbrella process you wont have any issues here.) The actual process for deploying the connector is here: https://securitydocs.cisco.com/docs/csa/olh/122462.dita
The AD connector needs to be installed on a Domain joined Windows server. This includes the Domain Controller itself. The connector software and a PowerShell script is downloaded from the Secure Access portal. The AD Connector only needs to be installed once, or twice if you want resiliency, but the PowerShell script needs to be ran on all Domain Controllers.
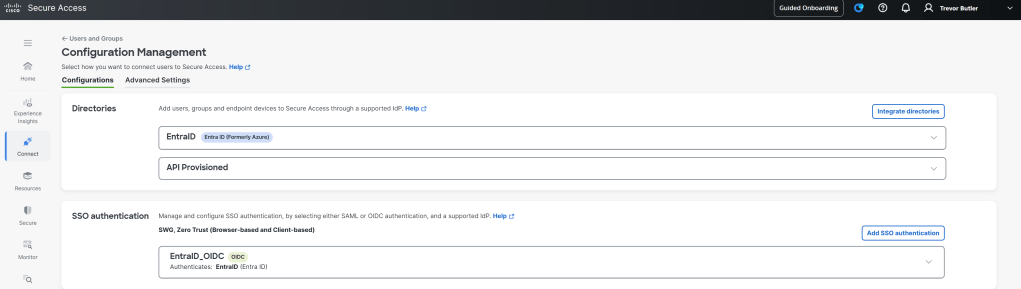
Getting to the download section for the Connector and script is a bit confusing. Cisco buried the download page deep in the UI. It took me a while to find it, so don’t feel bad if you are having the same issue. First navigate to Connect > Users, Groups, and Endpoint Devices. Then in the upper right corner click the Configuration Management button.

In the Configuration Manager page click Integrate Directories button under the Directories section. Then choose Active Directory. Go through the wizard and you will see on the last page the download for the AD connector and script links.
Secure Internet Access
Secure Internet Access is the SASE portion of SSE. Either through VPN tunnels to on-prem infrastructure or proxied via the Secure Client agent on hybrid employee endpoints traffic is sent to Cisco’s regional datacenters, through cloud firewalls to enforce policy, and out a shared public ip pool (however you can purchase a reserved IP from Cisco). For those familiar with Umbrella, this is the equivalent to Umbrella Secure Internet Gateway (SIG), but the only difference is SIG only tunneled web traffic TCP 80/443, where as SIA tunnels all traffic.
On-Premise Connectivity
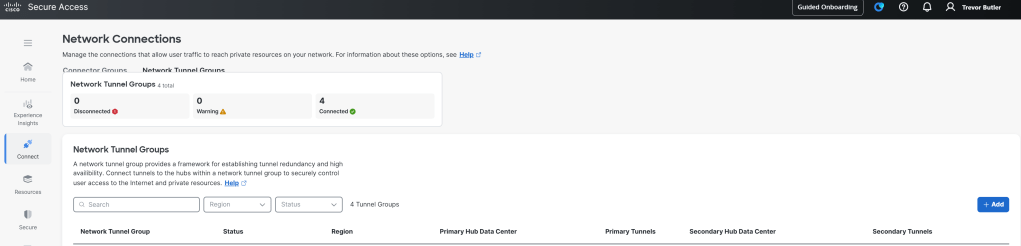
As said above, there are two ways to get traffic from users to Cisco’s datacenters, the first is through a VPN tunnel to on-prem and the second is via a Secure Client agent for endpoints that aren’t on-prem. To set up the VPN tunnels for on-Prem navigate to Connect > Network Connections. Then at the top left click on Network Tunnel Groups. Here you will see all of the status of all VPN tunnels, if you already have some configured. To add a tunnel Click the Add button on the right of the Network Tunnel groups section.
When you add a tunnel, you will need to select a regional datacenter to tunnel the traffic through. you can use this to send traffic to different Cisco Datacenters closest to your on-prem sites. Note that each regional datacenter shares the same policy, but will egress using a different public IP address pool. If you need to whitelist public IPs that your traffic will PAT to, then you will need to add one range per region that you choose.
The Cisco Documentation has examples of how to setup the VPN tunnels for different endpoints that you may use on-prem, rather than go into each configuration here please read the how-to for the platform you are peering with Secure Access. https://securitydocs.cisco.com/docs/csa/olh/120411.dita
Once you have the VPN tunnel setup and routing traffic over the tunnel you will notice that you can see source and destination IPs but not user identity. One of the things I was surprised to find out is that even if you have the AD connector for adding identity to DNS traffic, this identity store is not shared with the other modules in Secure Access.
Identify Traffic
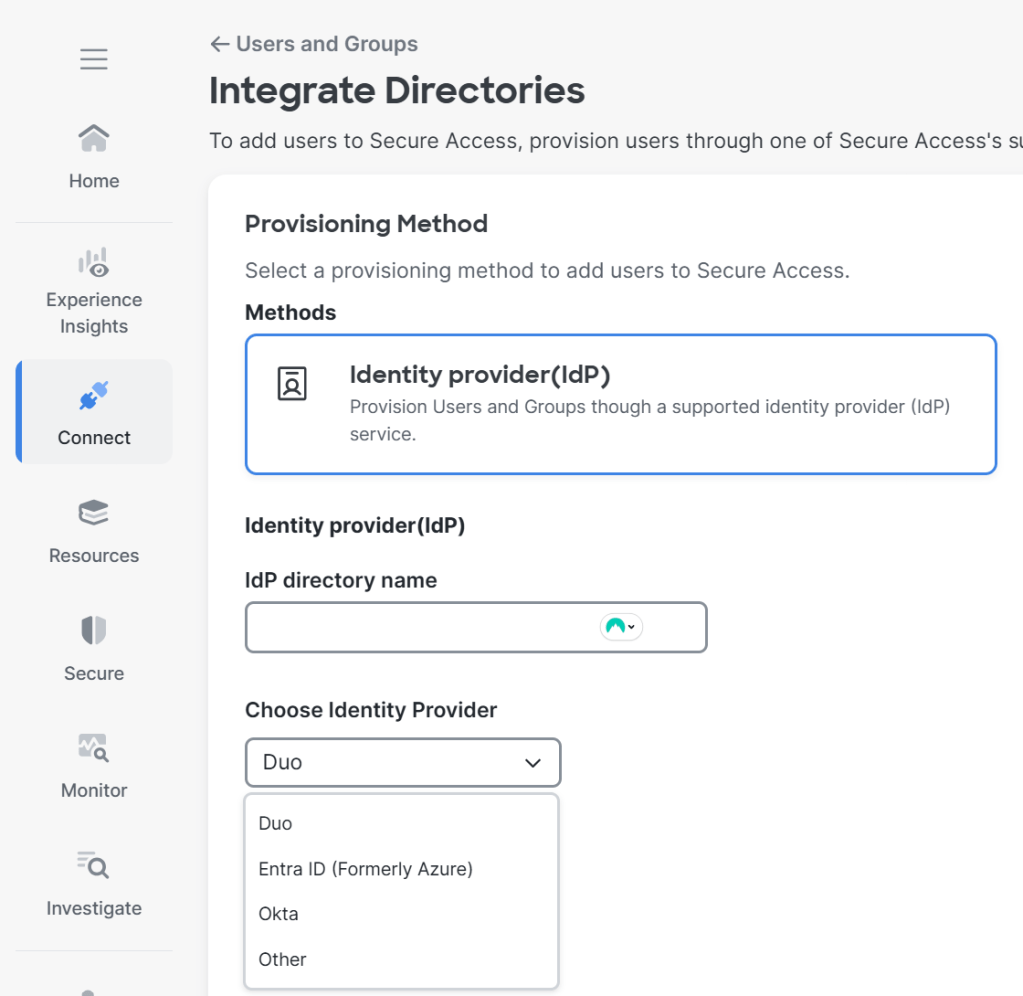
To add user identity to the SIA traffic you will need to configure an IdP directory and SSO. Navigate to Connect > Users, Groups, and Endpoint Devices. Then in the upper right corner click the Configuration Management button.
In the Configuration Manager page click Integrate Directories button under the Directories section. Then choose the IdP of your choice. Go through the wizard and you will see on the last page the download for the AD connector and script links.
Then choose the IdP of your choice. There are three native IdPs as of this writing: Duo, Entra ID, and Okta. go though the wizard to pull in users and groups. You can use these users and groups in the policy.
Back at the Configuration Management page, add a SSO Authentication with the IdP you configured in the directories section. click the Add SSO Authentication button and choose either SAML or OIDC, follow the wizard to set it up, using the directory you setup in the previous step.
Once configured users will be redirected to the SSO IdP to Authenticate users, Cisco will then store the IP to User mapping for the length specified in the “Re-authenticate Web Proxy Users” settings. In true SSO fashion, if the user already has a valid SSO token saved in their browser it will be used to Authenticate SIA, else they will be redirected to the IdP to login.
Because the User to IP mapping is fixed for a period of time, this will cause issues for Kiosk devices where multiple users will login to use the endpoint throughout the day. The user who logged in first will be mapped to the IP, for this reason we can bypass this mapping and use cookies stored in the local user browser. Cookies will then be sent by the user browser to Secure Access to authenticate the user. This way when a new user logs in they would need to reauthenticate to get a cookie in their local store.
This method is not as efficient as the IP to User mapping (called IP Surrogate) so Cisco recommends enabling IP Surrogate everywhere, and use the IP Surrogate bypass for just the kiosk devices that need cookie Surrogate.
To enable IP Surrogate and populate the bypass list for cookie Surrogate, navigate to Connect > Users, Groups, and Endpoint Devices, click on Configuration Management and click on the Advanced Settings menu in the upper left corner. Under Authentication Preferences section check to see if IP Surrogate is enabled. To add networks to the IP Surrogate bypass list click on the “Internal Network Bypass” link.

Secure Client Agent Connectivity
SIA is great when you are onsite, but what happens when you leave the secure bubble of the network? ZTA module on Secure Client to the rescue! The Zero Trust Access (ZTA) module is a new Secure Client module that redirects user traffic to the Secure Access Region datacenters and process the traffic against the policy. Just like on-prem the traffic leaves the Region in either a shared IP pool, or a reserved IP if one was purchased.
For those familiar with Umbrella this may sound familiar. With Umbrella Secure Web Gateway endpoint traffic is redirected by a Secure Client module to Umbrella to Umbrella similar to Secure Access. The main different is that SWG only proxies DNS and Web (TCP80, TCP443) traffic. With ZTA, all traffic is proxied to Secure Access. Note that if you already have SWG, you can deploy both modules. When both modules are present the ZTA module takes precedence, in fact you will see the SWG module will show as disabled. Having both provides some resiliency incase a user unenrolls in ZTA or the ZTA module fails, in that case the SWG module will reenable itself and proxy DNS and web traffic to be inspected.
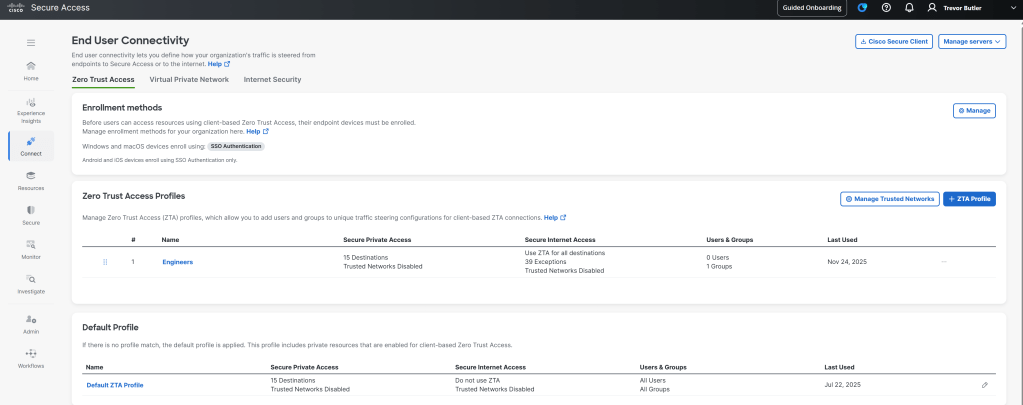
By default the ZTA module is only used for Secure Private Access, internet traffic is send out locally and only defined destinations are proxied over to Secure Access in a “split tunnel” type of architecture . As of this writing you will need to open a TAC case to enable “full tunnel” SIA for your organization. Then once complete you will see the full internet option available. To enable this, go to Connect > End User Connectivity. On the Zero Trust Access tab, either add a Zero Trust Access Profile, or edit the Default ZTA Profile.
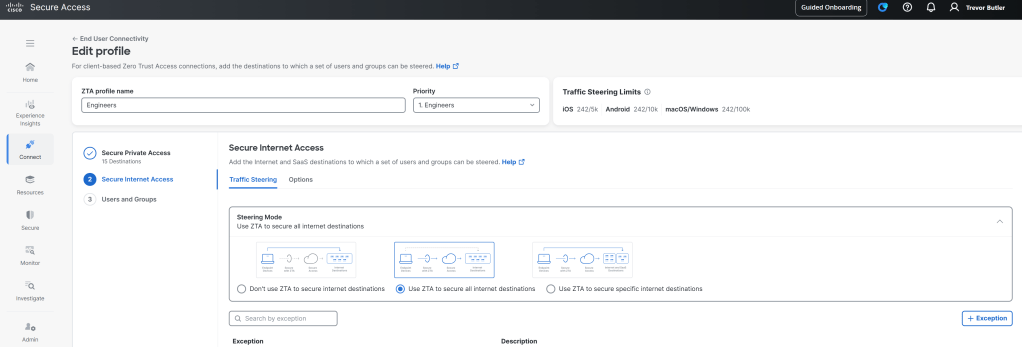
Once TAC has enabled “full tunnel” SIA then you will see the options under Secure Internet Access > Steering Mode. Choose User ZTA to secure all internet destination for the “full tunnel” experience. Note that you can create exceptions by clicking the Exceptions button just below the Steering Mode section. These exceptions will then not be proxied and go out locally. For instance, we found that real-time communications apps like Webex can be a bit unstable going through Secure Access via the ZTA module and so we bypass that traffic.
Once configured I find that using Cisco Secure Client Manager to package the new module is the easiest way. Then you can take that package and deploy it with software like Intune across the organization.
Deep packet inspection
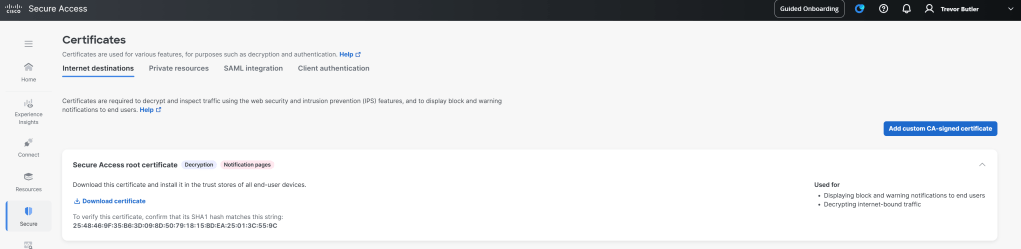
One of the nice things about Secure Access is the ease in which you can deploy decryption to provide deep packet inspection on the traffic traversing Secure Access. Secure Access will automatically decrypt all encrypted traffic coming from the internet and replace the certificate with their own certificate. To stop users browsers from showing that the certificate from the site is not trusted, you must install Cisco’s root certificate in the trusted store of your users. Again software like Intune are great for mass deploying things like root certificates to end user devices. Once install, you are good to go.
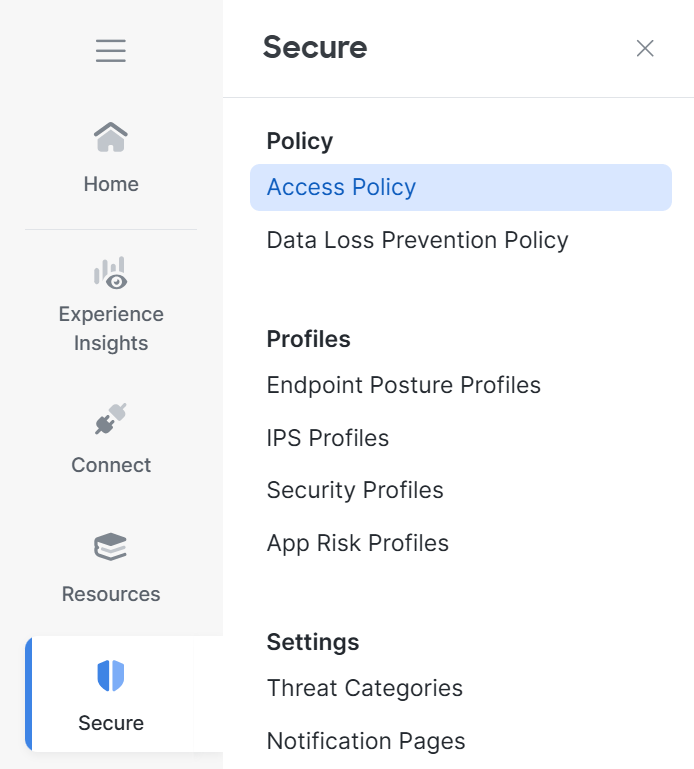
To find the certificate to download, navigate to Secure > Settings > Certificates. Then click the section called Secure Access root certificate and there you will find the Download certificate link.
Note that some applications will not like this, applications where the client side is using the server side certificate to verify its integrity will break. Because Cisco is replacing the certificate with their own, this will break the integrity of the application between the client and server. To get around this, Secure Access has a Do Not Decrypt list.
Navigate to Secure > Settings > Do Not Decrypt Lists. There is a system provided list that all policies will default to using. You can simply edit this list and add the domains that you want Secure Access to exclude from Deep Packet Inspection.
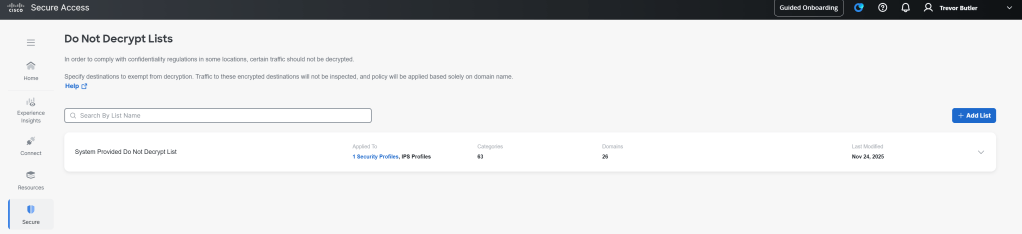
Additionally, you can create custom lists that you can set for specific policies if you need additional granularity where a single list across all of your polices doesn’t cut it.
Secure Private Access
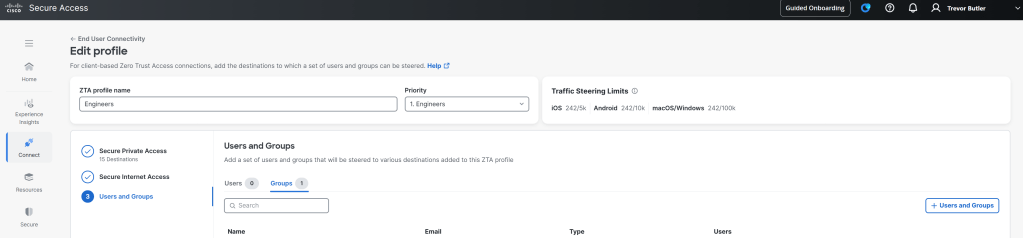
Secure Private Access (SPA) is the final component to Secure Access. The point of SPA is to provide remote users access to internal private resources without the need to provide the user full VPN access. SPA is built with the full Zero Trust architecture in mind. Zero Trust Access Profiles are configured to match resources with group policy matching user groups to on-prem resources. So users in finance can get to the on-prem Quickbooks server, and IT Security engineers can get to Firewall Management Center while at home, but neither can get to each others resources.
SPA utilizes the same ZTA module in used in the “Secure Client Agent Connectivity” section of this post. I won’t go through the setup for deployment of that module again here, so if you need to know, go read that section.
To configure SPA you will need to create custom ZTA profiles, or in the case where everyone with the ZTA module needs access to a private resource modify the default ZTA profile.
In the last section we only configured SIA using the second menu option in the ZTA profile to set the “full tunnel” mode and add any exceptions. For SPA we will need to utilize the first and third sections. Under Secure Private Access > Traffic Steering you can add internal destinations by click the Destinations button the the far right. This is where you define the FQDN or private IP address of the resource you want accessed via ZTA.

Next click on the Users and Groups section (#3) and here is where you will define which users and groups will match this profile. The users and groups that will show up to be allowed have to be imported from the directories that you integrated with way at the beginning of this post. If you don’t see the user or group in the Connect > Users, Groups, and End Devices page then you wont be able to use that group here, so make sure all the users and groups you intent to use in Secure Access are imported from the appropriate directory.
So now you have a profile, and technically the ZTA module will attempt to provide users access to the private resource. But the question remains, how does Secure Access route traffic from ZTA back on-prem to access the resource. There are two main ways Secure Access does this.
The first is over the VPN tunnel you may have configured for on-prem SIA. User traffic from ZTA is presented to the network as part of the Carrier Grade NAT pool (100.64.0.0/10). When you go through the setup of the VPN more often than not you will be using BGP to advertise routes between the on-prem network and Secure Access. You will see a subnet advertised from Secure Access in the Carrier Grade NAT range. So making sure any route redistribution or NATing on your end is in place to facilitate routing of these packets is a must.
But what if you don’t need on-prem SIA, and never setup the VPN tunnels? The second way Secure Access can access private resources is with Network Connectors. Connectors are virtual machines that live on the local network where the private resources are. Traffic is proxied from ZTA to these VMs and present as the IP of the connector on the network, so no need to deal with route redistribution. Here is the full deployment guide for creating Connectors: https://securitydocs.cisco.com/docs/csa/olh/120659.dita
To create a connector navigate to Connect > Network Connections. Under Connector Groups add anew Connector Group. Think of each location that the Connectors will be deployed as a Connector Group. Go through the wizard to specify the type of VM that will be deployed and what Secure Access region to link to.

Then once the group is created, click into the group and under Connectors click add to download the VM image. Before exiting the Connector Group click over to the Assigned Resources tab and add which local resources are available through this Connector group. This is important because some resources may be completely siloed from certain locations, so we want to let Secure Access know which connectors to proxy traffic to for which resources.
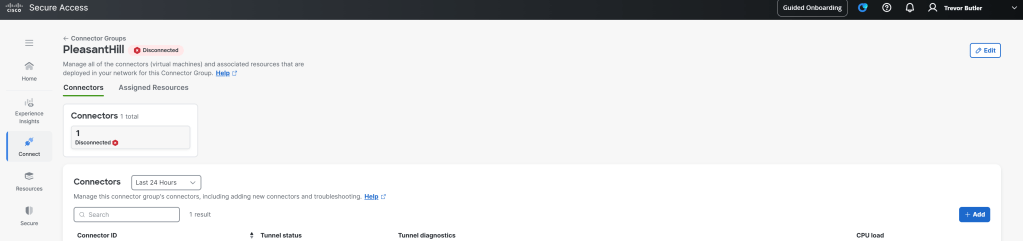
Once the connectors are up and showing connected in the Connector Groups page, then you should be able to get to private resources from the ZTA module.
Shared Policy
Throughout this post I hinted at Policy but never talked about it. In Secure Access All components share the same policy. This unified policy means that you state your business logic once, and Secure Access will use that information to create a DNS policy, create firewall rules on the cloud based firewalls, or inform policy in ZTA for internal resources.
This reduces having to rewrite the same policy over and over as well as reduce errors between components. To write the policy navigate to Secure > Access Policy.
Here you will be able to write policy just like a firewall rule, specifying users and groups as sources and resources and categories as destinations. Or you can be a bit more permissive and allow all traffic (say to the internet) but apply IPS and content filtering rules.
Check out the Cisco docs to see more granular details on creating policy: https://securitydocs.cisco.com/docs/csa/olh/118910.dita
Hopefully now you will be able to understand the different components of Secure Access, and have a better understanding of why you would use it, and how each component works together to create a secure edge.
